从 Debian 10 Buster 升级 Debian 11 Bullseye
背景说明
Debian 最新的稳定版 11 Bullseye(靶心) 已经发布快半年了,新版本提供了更新包和五年的支持,其中包括新版带来了 GCC 10.2, Nginx 1.18, PHP-FPM 7.4,Python 3.9, Rustc 1.48 等众多的更新。具体更新的包清单,可参见 What’s new in Debian 11?。
而 AWS EC2 和 Linode 服务器可供选择的最新版本尚停留在 Debian 10,因此笔者需要手动进行 dist 升级。本文章将记录从 Debian 10 Buster 更新到 Debian 11 Bullseye 时用到的命令和遇到的坑。
升级前的准备
记录日志
强烈推荐使用 /usr/bin/script 程序来记录升级会话中的交互信息。这样如果有问题了,我们就有一份日志可供追溯。而且需要的话,它也可以在 Bug Track 报告中向开源社区提供准确的信息。
开始记录
要开始记录,在终端中输入:
phase=prepare
script -t 2>~/upgrade-11_$phase.time -a ~/upgrade-11_$phase.script
命令说明:
- 介绍:
script将终端上显示的所有内容制作成打字稿。它会将交互式会话中的所有输入和输出记录下来。我们可以使用 cat 进行查看记录,也可以稍后使用 lpr 把打字稿文件打印出来。 - 参数
-a, --appendAppend the output to file or to typescript, retaining the prior contents.
将终端显示内容记录到文件或打字稿,采用追加写,不会覆盖原有的内容。-t[file], --timing[=file]Output timing data to standard error, or to file when given. This data contains two fields, separated by a space. The first field indicates how much time elapsed since the previous output. The second field indicates how many characters were output this time. This information can be used to replay typescripts with realistic typing and output delays.
记录计时信息到标准错误,或给定的文件中。输出的内容包含两个以空格隔开的字段。第一个字段表示距离上一输出,过去了多长时间,也就是命令的输出耗时。第二个字段,表示在本次输出了多少个字符。结合这些信息,我们可以使用原来实际的速度(比如输入时打字停顿了多长时间,输出行与行的延迟)回放打字稿。
此外,我们还引入了 phase 变量,以此来区分不同的操作阶段,比如升级前的准备步骤,升级时的操作步骤,升级重启后的善后步骤等。
记录格式
记录的示例格式如下:
#_# Prepare Phase: 一开始的准备阶段
$ phase=prepare
$ script -t 2>~/upgrade-11_$phase.time -a ~/upgrade-11_$phase.script
#_# 打字稿记录开始,内容将追加写入到 -a 参数指定的文件中
Script started, file is /home/whoiam/upgrade-11_prepare.script
$ sudo apt update
[sudo] password for whoiam:
Hit:1 http://deb.debian.org/debian buster InRelease
Get:2 http://deb.debian.org/debian buster-updates InRelease [51.9 kB]
Get:3 https://download.docker.com/linux/debian buster InRelease [54.0 kB]
Get:4 http://security.debian.org/debian-security buster/updates InRelease [65.4 kB]
Get:5 http://security.debian.org/debian-security buster/updates/main Sources [206 kB]
Get:6 http://security.debian.org/debian-security buster/updates/main amd64 Packages [311 kB]
Get:7 http://security.debian.org/debian-security buster/updates/main Translation-en [168 kB]
Fetched 856 kB in 0s (1825 kB/s)
Reading package lists... Done
Building dependency tree
Reading state information... Done
All packages are up to date.
$ cat /etc/debian_version
10.11
$ lsb_release -idrc
Distributor ID: Debian
Description:    Debian GNU/Linux 10 (buster)
Release:        10
Codename:       buster

$ logout
#_# 当前 shell 会话非 Login Shell,无法退出登录
bash: logout: not login shell: use `exit'

$ exit
exit
#_# 退出当前 shell 会话,自动结束记录
Script done, file is /home/whoiam/upgrade-11_prepare.script由此可见,script 命令自动帮我们建立了一个新的 shell 会话(非 Login Shell),内嵌在当前的 Login shell 中。同时该命令将我们在会话的标准输入,标准输出以及标准错误都记录到指定文件中。当我们打 exit 会退出新的,结束会话记录,回到旧的 shell 中。不难猜想,这是利用类似 Hook 的机制来实现的。
重放过程
如果 script 记录时使用了 -t 选项记录了计时信息,那么我们就可以用 scriptplay 命令来回放整个过程:
$ phase=prepare
$ scriptreplay ~/upgrade-11_$phase.time ~/upgrade-11_$phase.script
视频 1: 会话命令的回放过程
无法建立新的 SSH 连接
别担心,在升级过程之前已经建立的 Secure Shell(SSH)连接仍能继续工作,但是在升级过程中无法建立新的 SSH 连接,罢工时间视升级包数量而定。要是网络连接不稳定的话,升级过程极有可能被断开的 SSH 连接所终止。
为避免此类情形及其后遗症的发生,在此建议大家在进行全系统升级前单独升级 openssh-server 软件包或者使用 tmux 或 screen 维持后台会话。
备份数据
系统数据和配置
在升级之前,笔者强烈建议大家先进行一次完整的全量备份,或者至少备份不愿意丢失的业务数据和配置信息。
需要备份的内容主要包括
/etc下的配置/var/lib/dpkg下的包/var/lib/apt/extended_states包状态记录- 以及
dpkg --get-selections "*"命令的输出(注意:命令行中的引号必须要有,否则会被解释成通配符)。
如果你是使用 aptitude(APT 命令的前端) 来管理系统上的软件包,那么还需要备份 /var/lib/aptitude/pkgstates。
用户数据和配置
虽说升级过程中不会修改 /home (用户主目录)下的任何文件。但某些程序(例如 GNOME 以及 KDE 桌面环境)会在新版本的程序首次启动时用新的默认值来覆盖现有的用户设置。
做为一种防范覆盖的预防措施,可能需要备份 /home/user/ 的隐藏文件和目录(dotfiles),比如 .config, .zshrc, .profile 等。这些备份有助于快速恢复或者重建原有的设置偏好。
若是主目录下的数据非常重要,务求万无一失,请在升级前备份或者 umount /home 分区,杜绝其它进程染指用户数据的可能。
提前告知用户
提前告知用户,维护服务器的操作时间安排。这里的用户包括普通的外部客户以及通过 SSH 连接本服务器的内部用户。
准备服务停机
升级时
如果 Debian 11 升级的更新包包含对外提供服务的程序,那么在升级期间,当相关软件包被更新和重配置时,这些服务将被停止。在此期间,这些服务将无法使用。
这些服务的精确停机时间将根据系统中升级的软件包数量而有所不同,并且还要包括系统管理员在软件包升级过程中回答任何配置问题的时间。请注意,若是升级过程无人值守,并且系统在升级过程中请求输入(新旧版软件参数不一样,询问用户保留新版的或已有的配置,诸如此类问题),则很可能在很长时间内无法使用服务。
升级后
当升级到 Bullseye 后(全系统包升级完成),我们需要进行内核升级,所以整个系统需要重启,做好服务暂停的通知。重启后,新版本的软件不一定完全兼容旧版的配置,因此需要巡查一遍对外提供服务的程序,确认是否正常运行。
准备故障恢复
建议升级先对系统打个快照。若是完全更新并重启后发现出错,及时进行版本回滚。
净化系统
从『纯净』的 Debian 10 系统开始升级
何谓纯净
何谓纯净,就是 APT 软件源都是官方提供的包,正因为源自官方,所以版本发布前的升级流程自测基本覆盖这些包。
如果你在 APT 配置加入了 Buster 之外的额外软件源,或者你安装了来自其他版本或第三方来源的软件包,那么你的软件源就是非纯净的。而官方在升级自测时也不能面面俱到,测试全部第三方包的兼容性。因此,为了确保升级过程可靠,可能需要事先去除这些可能导致问题的包。
移除非 Debian 包
下面有两种方法可以查找非 Debian 官方源的已安装软件包,使用 aptitude 或者 apt-forktracer。[^1]
$ sudo aptitude search '?narrow(?installed, ?not(?origin(Debian)))'
$ sudo apt-forktracer | sort请注意,两者的查找结果基本正确,但都不是 100% 准确(上面的 aptitude 示例将列出曾经由 Debian 提供但后续不再包含的软件包,例如旧的内核软件包,linux-headers, 旧的 PHP 解释器 php 7.3)。
清理过时的软件
未移除过时(废弃)的软件就草率升级可能会使升级过程复杂化,而且它们因不再得到维护而可能带来安全风险。
$ sudo aptitude search '~o'
$ sudo aptitude purge '~o'
软件包被从发行版中移除有很多原因,如:
- 它们不再被上游作者维护了;
- 没有 Debian 开发者对维护这个包感兴趣;
- 这些包提供的功能被不同的软件(或新版本)替代了;
- 由于它们自身的缺陷,使得它们被认为不适用于 Bullseye。
最后一种情况下,这些包有可能仍然位于 “unstable” 版之下。
清理过时的配置
升级前,除陈旧
在将系统升级到 Bullseye 之前,建议从系统中删除旧的配置文件(例如 /etc 下的 *.dpkg-{new,old} 文件)。
升级后,去残留
更新过系统后可能残留某些不再使用的配置文件副本、旧版本配置文件、软件包维护者提供的其他版本等等。从系统中移除这些残留文件可以避免出现混淆。可以使用如下命令查找残留文件:
$ sudo find /etc -name '*.dpkg-*' -o -name '*.ucf-*' -o -name '*.merge-error'检查包状态
在升级之前,检查所有软件包的状态,并验证所有包都处于可升级状态。以下命令会显示任何半安装(Half-Installed)或是配置失败的包,还有那些有任何错误状态的包。
$ sudo dpkg --audit输出包的状态
输出系统中的所有软件包的状态
$ sudo dpkg -l | pager或
$ sudo dpkg --get-selections "*" > ~/curr-pkgs.txt
$ cat ~/curr-pkgs.txt
acpid                                           install
adduser                                         install
apt                                             install
apt-transport-https                             install
base-files                                      install
base-passwd                                     install
bash                                            install
bash-completion                                 install
bsdutils                                        install
busybox                                         install
bzip2                                           install
ca-certificates                                 install
certbot                                         install
chrony                                          deinstall
cloud-guest-utils                               install
cloud-image-utils                               install
cloud-init                                      install
...
移除 hold 状态的包
在升级前移除所有处于 hold 状态的包是很有必要的。如果有任何对升级而言有重大影响的包处于 hold 状态,升级会失败。
包的状态包括三部分: Status:
Want Flag Status
- Want: one of unknown, install, hold, deinstall, purge.
- Flag: one of ok, reinstreq, hold, hold-reinstreq.
- Status: one of not-installed, unpacked, half-configured, installed, half-installed config-files, post-inst-failed, removal-failed.
注意 aptitude 使用一种与 apt 以及 dselect 不同的方法来注册 hold 状态的包。 可用以下命令来识别 aptitude 中处于 hold 状态的包
$ sudo aptitude search "~ahold" 如果你想检查 apt 中哪些包设置了 hold 状态,应使用
$ sudo dpkg --get-selections | grep 'hold$'找到 hold 状态包后,执行 apt purge $pkg_name 进行删除。
检查自编译的包
如果你在本地更改并重新编译了一个包,且并未重命名它,或是在版本号中放入新的纪元号(epoch),那么你就必须将它设为 hold 状态,以防止它被升级。
apt 包管理器中的 『hold』 状态的包可以使用以下命令修改:
$ echo $pkg_name hold | sudo dpkg --set-selections反之亦同,如果想要把 hold 改成 install,修改管道 Pipe 左侧的输入,即可清除 『hold』 状态。
确认系统版本
由于本篇文章限定升级前的版本是 Debian 10。如果你的版本比 Debian 10 还旧,请按照 Debian 10 发行说明中的步骤,先升级到 Debian 10。你可以运行下面的命令来获取当前的 Debian 版本
$  cat /etc/debian_version
10.11
$ lsb_release -idrc
Distributor ID: Debian
Description:    Debian GNU/Linux 10 (buster)
Release:        10
Codename:       buster
注意:除了 Major 大版本升级到 Debian 10,也要将系统升级到 Debian 10 的最新 Minor 小版本,命令如下:
$ sudo apt update
$ sudo apt upgrade
$ sudo apt full-upgrade
$ sudo apt --purge autoremove
升级操作
APT Source
替换软件源,将 buster(10)替换成 bullseys(11):
sudo find /etc/apt/ -type f -name "*.list" -print0 | \
sudo xargs -0 -t sed -i -E "s/buster/bullseye/gi"
在替换后,尝试从新的软件源头更新包信息,会发现安全库(修补漏洞)分支下 bullseye/updates 找不到:
$ sudo apt update
...
Err:7 http://security.debian.org/debian-security bullseye/updates Release
  404  Not Found [IP: 2a04:4e42:48::644 80]
Get:8 http://deb.debian.org/debian bullseye/main Translation-en [6,243 kB]
Get:9 http://deb.debian.org/debian bullseye-updates/main Sources [1,868 B]
Get:10 http://deb.debian.org/debian bullseye-updates/main amd64 Packages [2,592 B]
Get:11 http://deb.debian.org/debian bullseye-updates/main Translation-en [2,343 B]
Get:12 https://download.docker.com/linux/debian bullseye/stable amd64 Packages [7,436 B]
Reading package lists... Done
E: The repository 'http://security.debian.org/debian-security bullseye/updates Release' does not have a Release file.
N: Updating from such a repository can't be done securely, and is therefore disabled by default.
N: See apt-secure(8) manpage for repository creation and user configuration details.
观察其它有效条目的命名规则可知,Buster 和 Bullseye 命名方式略有不同,将 Security 包后的 bullseye/updates 替换成 bullseye-security 即可,一行命令搞定。
sudo find /etc/apt/ -type f -name "*.list" -print0 | \
sudo xargs -0 -t sed -i 's/bullseye\/updates/bullseye-security/g'
援引官方文档 Issues to be aware of for bullseye,摘录如下:
5.1.3. Changed security archive layout
5.1.3. 安全更新仓库的布局变化
For bullseye, the security suite is now named bullseye-security instead of codename/updates and users should adapt their APT source-list files accordingly when upgrading.
对 bullseye 版本来说,安全更新套装已从codename/updates重命名为bullseye-security;用户应该在升级的同时相应更改 APT source-list 文件。The security line in your APT configuration may look like:
您的 APT 配置文件中与安全更新相关的行,应当仿照如下填写:
deb https://deb.debian.org/debian-security bullseye-security main contrib
An example of a working APT::Default-Release line for bullseye looks like:
对于 bullseye 版本而言,一个有效的 APT::Default-Release 行,形如:
APT::Default-Release "/^bullseye(|-security|-updates)$/";which takes advantage of the undocumented feature of APT that it supports regular expressions (inside /).
这利用了 APT 的一个未在文档中说明的特性,即对正则表达式的支持(将表达式在两个/之间)。
到这里,我们已经可以正常获取 Debian 11 源包含的的软件包,接下来执行升级。
APT Upgrade
从旧版的 Debian 版本升级的推荐方法是使用默认包管理工具 apt。
⚠ 注意
apt被设计用于交互式使用,故不应在脚本中使用。
在脚本中,应该使用apt-get,它具有更适合进行文本处理的稳定输出。
检查空间
在升级系统之前,确保有足够的硬盘空间来存放下载的更新包。下载包的存储位置如下
/var/cache/apt/archives: 通过网络下载的、待安装的软件包/var/cache/apt/archives/partial: 正在下载的文件
因此我们必须确保 /var/ 目录所属的文件系统分区有足够的空间,来临时存放下载好的待安装的软件包。下载后,其他文件系统分区中也需要更多的空间,以便安装升级的软件包(可能需要解压)及升级中带入的相关依赖。如果你的系统没有足够的空间,那么可能会陷入进退两难境地——一个未完全升级却又难以还原的系统。
可通过运行以下命令,来估计更新包的磁盘占用:
$ sudo apt -o APT::Get::Trivial-Only=true full-upgrade
Reading package lists... Done
Building dependency tree
Reading state information... Done
Calculating upgrade... Done
...
421 upgraded, 73 newly installed, 7 to remove and 1 not upgraded.
Need to get 316 MB of archives.
#_# 需下载 316 MB 的压缩包。
After this operation, 525 MB of additional disk space will be used.
#_# 解压缩后,还会消耗 525 MB 的额外空间。
E: Trivial Only specified but this is not a trivial operation.
结合磁盘空闲空间命令,看看剩余的空间是否大于需要的空间:
$ df -h -t ext4
#_# -t 参数限定只查询文件系统为 ext4 的挂载点
Filesystem      Size  Used Avail Use% Mounted on
/dev/vda1        24G  4.8G   18G  22% /
...
可见,剩余 18G >> 所需 841 M,可以安全无虞地执行升级操作😊。
执行升级
现在软件源列表更新完毕,并且磁盘空间足够,是时候开始升级了。
$ sudo apt full-upgrade接下来,系统将开始下载更新包,解压,卸载旧版,安装新版等。下载时间依你的网络带宽而定。
用户介入
取决于系统的配置和安装包,可能会有一些提示需要用户干预,比如一些软件不同版本的配置不一样,系统会询问是否采用新版的配置,还是选择当前的配置?
Nginx
保留旧有配置,不要使用默认配置,1.18 新增的语法或功能后面再手动开启。
Setting up nginx-common (1.18.0-6.1) ...
Installing new version of config file /etc/nginx/fastcgi.conf ...
Installing new version of config file /etc/nginx/fastcgi_params ...

Configuration file '/etc/nginx/nginx.conf'
 ==> Modified (by you or by a script) since installation.
 ==> Package distributor has shipped an updated version.
   What would you like to do about it ?  Your options are:
    Y or I  : install the package maintainer's version
    N or O  : keep your currently-installed version
      D     : show the differences between the versions
      Z     : start a shell to examine the situation
 The default action is to keep your current version.
*** nginx.conf (Y/I/N/O/D/Z) [default=N] ? N

Configuration file '/etc/nginx/sites-available/default'
 ==> Modified (by you or by a script) since installation.
 ==> Package distributor has shipped an updated version.
   What would you like to do about it ?  Your options are:
    Y or I  : install the package maintainer's version
    N or O  : keep your currently-installed version
      D     : show the differences between the versions
      Z     : start a shell to examine the situation
 The default action is to keep your current version.
*** default (Y/I/N/O/D/Z) [default=N] ? N
Sysctl
若是你不清楚之前对该文件做了什么变更,可以输入 D,比对一下两个版本的差异。
笔者是安装了 BBR 加速,因此对系统的网络连接参数做了修改。跨版本升级后需要重新配置 BBR,此处先用默认配置覆盖。
BBR 是 Google 提出的一种新型拥塞控制算法,可以使 Linux 服务器显著地提高吞吐量和减少 TCP 连接的延迟。
感兴趣的读者,可自行了解 Google BBR Congestion Control Algorithm
Configuration file '/etc/sysctl.conf'
 ==> Modified (by you or by a script) since installation.
 ==> Package distributor has shipped an updated version.
   What would you like to do about it ?  Your options are:
    Y or I  : install the package maintainer's version
    N or O  : keep your currently-installed version
      D     : show the differences between the versions
      Z     : start a shell to examine the situation
 The default action is to keep your current version.
*** sysctl.conf (Y/I/N/O/D/Z) [default=N] ? Y
SSH
Configuring openssh-server
A new version (/tmp/tmp.WEUBEtTwS5) of configuration file
/etc/ssh/sshd_config is available, but the version installed currentlyhas been locally modified.                                                                                                                           What do you want to do about modified configuration file sshd_config?

 + install the package maintainer's version
 + keep the local version currently installed
 + show the differences between the versions
 + show a side-by-side difference between the versions
 + show a 3-way difference between available versions
 + do a 3-way merge between available versions
 + start a new shell to examine the situation
关于 SSH Daemon 的配置,先看下 Side-by-Side Diff,差异主要是添加了一句 Include 文件夹下的配置,其余基本不变。务必选择保留旧版,不然 SSH 将被重置为 22,自定义的安全配置(如禁止 root 登录,仅通过公钥登录)会丢失。
+Include /etc/ssh/sshd_config.d/*.confFail2Ban
Fail2Ban 自动封禁多次连接失败的 IP。在原版的基础上,增加了更严格的过滤,即添加了几个自定义的正则表达式。更新版本后,再重新配置。
Configuration file '/etc/fail2ban/filter.d/sshd.conf'
 ==> Modified (by you or by a script) since installation.
 ==> Package distributor has shipped an updated version.
   What would you like to do about it ?  Your options are:
    Y or I  : install the package maintainer's version
    N or O  : keep your currently-installed version
      D     : show the differences between the versions
      Z     : start a shell to examine the situation
 The default action is to keep your current version.
*** sshd.conf (Y/I/N/O/D/Z) [default=N] ? Y
重启
升级完成后重启
sudo systemctl reboot升级后
验证版本
验证升级后的版本确为 11.2:
$ cat /etc/debian_version
11.2
$ lsb_release -idrc
Distributor ID: Debian
Description:    Debian GNU/Linux 11 (bullseye)
Release:        11
Codename:       bullseye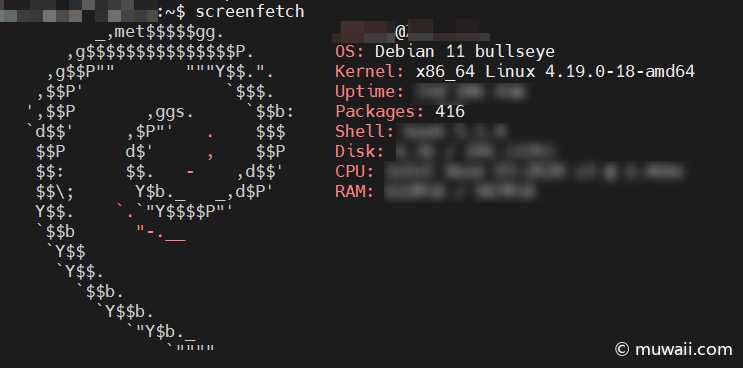
图 1: 新版本的系统信息
不需要的软件
清理升级后不再需要的软件包,比如 Python 2.7, Python 3.7, Perl 5.28, Cpp 8等。
# The following packages were automatically installed and are no longer required:
#   bsdmainutils cpp-8 libasan5 libbind9-161 libdns1104 libdns1110 libevent-2.1-6 libicu63
#   libirs161 libisc1100 libisc1105 libisccc161 libisccfg163
#   libisl19 libkyotocabinet16v5 liblwres161 libmpdec2 libmpx2 libperl5.28 libpython2-stdlib #   libpython2.7 libpython3.7-minimal libpython3.7-stdlib
#   libreadline7 python2 python2-minimal python3-asn1crypto python3.7-minimal
# Use 'sudo apt autoremove' to remove them.

$ sudo apt --purge autoremove
清理删除后的残留
通常建议清理已删除的软件包残留的数据或配置。已知旧的 init.d 脚本会导致启动问题。
⚠ 注意
清理软件包通常也会清除其日志文件,旧版的日志还有利用价值的话,提前备份。
以下命令列出所有已删除、但可能在系统上留下配置文件的软件包的列表(如果有的话):
$ sudo dpkg -l | awk '/^rc/ { print $2 }'接着可以配合 apt purge 删除这些软件包:
$ sudo apt purge $(dpkg -l | awk '/^rc/ { print $2 }')使用 aptitude 也可以清理,以下是替代方法:
$ sudo aptitude search '~c'
$ sudo aptitude purge '~c'
不兼容的软件
Nginx
Nginx 从 1.14 升级到 1.18 后,通过 systemdctl status nginx.service 查到 Nginx 无法正常解析 PID,完整的日志可通过 journalctl 查到。
$ sudo journalctl -S "2022-01-12 16:00:00" -U "2022-01-12 17:15:00" -u nginx
-- Journal begins at Mon 2021-07-19 16:47:09 CST, ends at Wed 2022-01-12 17:27:16 CST. --
Jan 12 17:09:08 hostname systemd[1]: Stopping A high performance web server and a reverse proxy server...
Jan 12 17:09:08 hostname systemd[1]: nginx.service: Succeeded.
Jan 12 17:09:08 hostname systemd[1]: Stopped A high performance web server and a reverse proxy server.
-- Boot 04f9769d2cbf40679313134965a0de1f --
Jan 12 17:09:24 hostname systemd[1]: Starting A high performance web server and a reverse proxy server...
Jan 12 17:09:25 hostname systemd[1]: nginx.service: Failed to parse PID from file /run/nginx.pid: Invalid argument
Jan 12 17:09:25 hostname systemd[1]: Started A high performance web server and a reverse proxy server.
通过该错误的关键字,可找到 Ubuntu Bug Report #1581864 关于该 BUG 的讨论。由于 Ubuntu 是基于 Debian 的发行版,该问题的解法在 Debian 上也能正常工作。
sudo mkdir /lib/systemd/system/nginx.service.d
sudo su -c 'printf "[Service]\nExecStartPost=/bin/sleep 0.1\n" > /lib/systemd/system/nginx.service.d/override.conf'
#_# 重载 systemd 的配置
sudo systemctl daemon-reload
sudo systemctl restart nginx
sudo systemctl status nginx
Jan 12 17:42:35 hostname systemd[1]: Starting A high performance web server and a reverse proxy server...
Jan 12 17:42:35 hostname systemd[1]: Started A high performance web server and a reverse proxy server.
It seems to be a race between systemd and nginx. As if systemd was expecting the PID file to be populated before nginx had the time to create it.
这里解释一下,这是 Systemd 守护进程启动器与 Nginx 都尝试对 /run/nginx.pid 进行读 / 写,即资源竞态使用问题。在 OS 中引入多进程后,如果不进行妥善的时序编排,必然会因为这些进程对系统资源的无序争夺而给系统造成混乱。像上面两个或多个进程并发地读 / 写一个共享数据, 共享数据的值取决于最后访问它的进程的执行结果,这种情况称为竞态条件(Race Condition)。特别地,一次仅允许一个进程使用的资源称为临界资源(Critical Resource),典型的资源包括:慢速设备(打印机、磁带机等)、共享的变量、共享的文件、数据结构、缓冲区等。
在弄清楚问题的原因后,我们要做的就是保证对临界资源的互斥使用或访问——既然他们两者不同步,那么笔者手动帮他们同步,一次仅允许一个进程使用资源,使用完资源及时释放所有权。而在本问题中,Systemd 是期望 Nginx 先把自身的 PID 写入到 /run/nginx.pid 中,然后 Systemd 再去读取。
因此我们想让 Systemd 启动 Nginx 后,启动器休眠一定时长,再去检查 pid 文件的内容。这段起作用的代码就是 ExecStartPost=/bin/sleep 0.1,其中 ExecStartPost 字段表示在启动服务之后,启动器接着执行的命令,即实现我们上文的设想——启动 Nginx 后,启动器自身休眠 0.1 秒。
PHP 7.x
PHP 7.x 默认使用 socket 而非端口,而微服务中使用 ip_addr:port 更方便内部调用。
php_fpm_version=7.x
vim /etc/php/$php_fpm_version/fpm/pool.d/www.conf
将 FastCGI 请求的监听地址改为 listen = 127.0.0.1:9000,即监听本地端口。
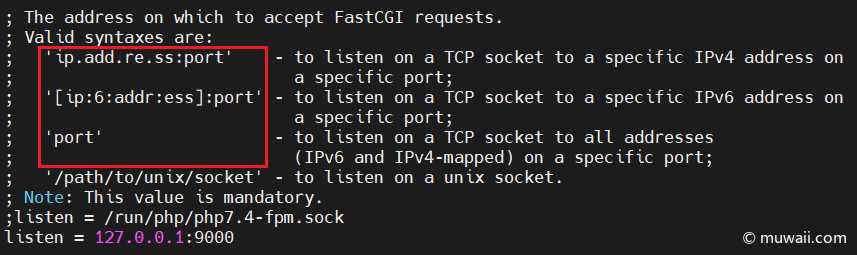
图 2: PHP FPM 监听地址
总结
这就是升级的全过程了!经历了备份,改源,更新,重启,修复兼容性,清理残留,至此顺利从 Debian Buster 10 升级 Debian Bulleyes 11。
虽然前期做了完整的数据备份,但是很庆幸没有经历难以修复的启动故障。这里建议大家升级前打个快照,做个备份,全程都用 script 记录操作步骤和问题日志,遇到问题也不慌不忙。单台测试升级成功了,再将命令制作成升级脚本,push 到集群中执行。
祝大家升级顺利,有问题可以留言🤞。Good Luck🍀~
