证书过期忘续?试试 15 年有效期的 Cloudflare Cert
问题背景
昨天访问域名提示证书过期,记得之前有配置了 certbot 自动更新,但是查看日志发现是 certbot renew 更新时出错了,报错指出其依赖 python3-certbot-nginx 没有装,这里需要夸下这种可插拔的插件设计。
想装该 plugin 时,依赖 Hell 出现了 —— certbot-nginx 本身又依赖 nginx-core,然而笔者的 Nginx 是自己从源码编译的,发行版中的 nginx-core 要比自编译的旧,很多新特性不支持(如 ssl_reject_handshake)。
想必,这就是不使用官方版本的坏处了:DIY 固然好,能跟上最近的包功能特性,但有一好没两好,周边的官方拓展库可能暂时没有为新版的包做适配,那么新副本开荒的工作就只能自己包揽过来做了。
报错的细节
找不到 nginx installer
The requested nginx plugin does not appear to be installed
2022-03-07 20:56:17,234:DEBUG:certbot.display.util:Notifying user: Processing /etc/letsencrypt/renewal/muwaii.com.conf
2022-03-07 20:56:17,238:DEBUG:certbot._internal.storage:Should renew, less than 30 days before certificate expiry 2022-03-07 06:43:56 UTC.
2022-03-07 20:56:17,238:INFO:certbot._internal.renewal:Cert is due for renewal, auto-renewing...
2022-03-07 20:56:17,238:DEBUG:certbot._internal.plugins.selection:Requested authenticator nginx and installer nginx
2022-03-07 20:56:17,238:DEBUG:certbot._internal.plugins.selection:No candidate plugin
2022-03-07 20:56:17,239:DEBUG:certbot._internal.plugins.selection:No candidate plugin
2022-03-07 20:56:17,239:DEBUG:certbot._internal.plugins.selection:Selected authenticator None and installer None
2022-03-07 20:56:17,239:INFO:certbot._internal.main:Could not choose appropriate plugin: The requested nginx plugin does not appear to be installed
2022-03-07 20:56:17,239:ERROR:certbot._internal.renewal:Failed to renew certificate muwaii.com with error: The requested nginx plugin does not appear to be installed
2022-03-07 20:56:17,239:DEBUG:certbot._internal.renewal:Traceback was:
Traceback (most recent call last):
  File "/usr/lib/python3/dist-packages/certbot/_internal/renewal.py", line 485, in handle_renewal_request
    main.renew_cert(lineage_config, plugins, renewal_candidate)
  File "/usr/lib/python3/dist-packages/certbot/_internal/main.py", line 1228, in renew_cert
    installer, auth = plug_sel.choose_configurator_plugins(config, plugins, "certonly")
  File "/usr/lib/python3/dist-packages/certbot/_internal/plugins/selection.py", line 235, in choose_configurator_plugins
    diagnose_configurator_problem("authenticator", req_auth, plugins)
  File "/usr/lib/python3/dist-packages/certbot/_internal/plugins/selection.py", line 339, in diagnose_configurator_problem
    raise errors.PluginSelectionError(msg)
certbot.errors.PluginSelectionError: The requested nginx plugin does not appear to be installed
完整的调用栈
2022-03-07 20:44:27,136:INFO:certbot._internal.log:Saving debug log to /var/log/letsencrypt/letsencrypt.log
2022-03-07 20:44:27,137:DEBUG:certbot.display.util:Notifying user: Processing /etc/letsencrypt/renewal/blog.muwaii.com.conf
2022-03-07 20:44:27,260:DEBUG:urllib3.connectionpool:http://r3.o.lencr.org:80 "POST / HTTP/1.1" 200 503
2022-03-07 20:44:27,261:DEBUG:certbot.ocsp:OCSP response for certificate /etc/letsencrypt/archive/blog.muwaii.com/cert1.pem is signed by the certificate's issuer.
2022-03-07 20:44:27,266:DEBUG:certbot.ocsp:OCSP certificate status for /etc/letsencrypt/archive/blog.muwaii.com/cert1.pem is: OCSPCertStatus.GOOD
2022-03-07 20:44:27,272:DEBUG:certbot._internal.storage:Should renew, less than 30 days before certificate expiry 2022-03-08 05:06:30 UTC.
2022-03-07 20:44:27,272:INFO:certbot._internal.renewal:Cert is due for renewal, auto-renewing...
2022-03-07 20:44:27,272:INFO:certbot._internal.renewal:Non-interactive renewal: random delay of 428.6950974408677 seconds
2022-03-07 20:51:36,067:DEBUG:certbot._internal.plugins.selection:Requested authenticator nginx and installer nginx
2022-03-07 20:51:36,408:ERROR:certbot._internal.renewal:Failed to renew certificate blog.muwaii.com with error: [Errno 2] No such file or directory: '/usr/lib/python3/dist-packages/certbot_nginx/_internal/tls_configs/options-ssl-nginx.conf'
2022-03-07 20:51:36,412:DEBUG:certbot._internal.renewal:Traceback was:
Traceback (most recent call last):
  File "/usr/lib/python3/dist-packages/certbot/_internal/renewal.py", line 485, in handle_renewal_request
    main.renew_cert(lineage_config, plugins, renewal_candidate)
  File "/usr/lib/python3/dist-packages/certbot/_internal/main.py", line 1228, in renew_cert
    installer, auth = plug_sel.choose_configurator_plugins(config, plugins, "certonly")
  File "/usr/lib/python3/dist-packages/certbot/_internal/plugins/selection.py", line 226, in choose_configurator_plugins
    installer = pick_installer(config, req_inst, plugins, installer_question)
  File "/usr/lib/python3/dist-packages/certbot/_internal/plugins/selection.py", line 30, in pick_installer
    return pick_plugin(
  File "/usr/lib/python3/dist-packages/certbot/_internal/plugins/selection.py", line 106, in pick_plugin
    verified.prepare()
  File "/usr/lib/python3/dist-packages/certbot/_internal/plugins/disco.py", line 300, in prepare
    return [plugin_ep.prepare() for plugin_ep in six.itervalues(self._plugins)]
  File "/usr/lib/python3/dist-packages/certbot/_internal/plugins/disco.py", line 300, in <listcomp>
    return [plugin_ep.prepare() for plugin_ep in six.itervalues(self._plugins)]
  File "/usr/lib/python3/dist-packages/certbot/_internal/plugins/disco.py", line 157, in prepare
    self._initialized.prepare()
  File "/usr/lib/python3/dist-packages/certbot_nginx/_internal/configurator.py", line 201, in prepare
  File "/usr/lib/python3/dist-packages/certbot_nginx/_internal/configurator.py", line 173, in install_ssl_options_conf
  File "/usr/lib/python3/dist-packages/certbot/plugins/common.py", line 350, in install_version_controlled_file
    current_hash = crypto_util.sha256sum(src_path)
  File "/usr/lib/python3/dist-packages/certbot/crypto_util.py", line 518, in sha256sum
    with open(filename, 'r') as file_d:
FileNotFoundError: [Errno 2] No such file or directory: '/usr/lib/python3/dist-packages/certbot_nginx/_internal/tls_configs/options-ssl-nginx.conf'
简单分析
从上面的日志,可以看到每个域名都有一个对应的配置文件,里面的内容如下:
$ cat /etc/letsencrypt/renewal/muwaii.com.conf
# renew_before_expiry = 30 days
version = 1.24.0
archive_dir = /etc/letsencrypt/archive/muwaii.com
cert = /etc/letsencrypt/live/muwaii.com/cert.pem
privkey = /etc/letsencrypt/live/muwaii.com/privkey.pem
chain = /etc/letsencrypt/live/muwaii.com/chain.pem
fullchain = /etc/letsencrypt/live/muwaii.com/fullchain.pem

# Options used in the renewal process
[renewalparams]
authenticator = nginx
server = https://acme-v02.api.letsencrypt.org/directory
account = xxxxxxxxxxxxxxxxxxxxxxxxxxxxxxxx
installer = nginx
可见,除了记录了存放的证书和私钥文件之外,更关键要数 installer 和 authenticator 这两个字段。certbot 报错正是因为 installer 没有找到。
两种解法
此时进退各有两种解法:
- 退一步:一种是安装 python3,并使用 pip3 依赖管理工具安装
certbot-nginx,绕过 apt 包管理器中该插件对旧版的 nginx-core 的依赖。 - 进一步:不用 Let's Encrypt 的证书,由于有效期太短,三个月一换。即便有自动化脚本代劳,指不定哪天因为出错导致证书过期而挂掉。与之相比,全球领先的 CDN 服务商 Cloudflare 则提供了 15 年有效期的证书,堪称业界良心。
退:绕过 Apt 包依赖
在进行下一步操作前,先对一下基本的系统环境信息,不同的操作系统或版本号,可能有差异,笔者无法兼顾,读者若是有问题,欢迎在评论区留言。
$ screenfetch
         _,met$$$$$gg.           xxx@yyy
      ,g$$$$$$$$$$$$$$$P.        OS: Debian 11 bullseye
    ,g$$P""       """Y$$.".      Kernel: x86_64 Linux 5.10.0-11-amd64
   ,$$P'              `$$$.      Uptime: 99d 19h 9m
  ',$$P       ,ggs.     `$$b:    Packages: 450
  `d$$'     ,$P"'   .    $$$     Shell: bash 5
   $$P      d$'     ,    $$P     Disk: 34%
   $$:      $$.   -    ,d$$'     CPU: Intel
   $$\;      Y$b._   _,d$P'      RAM: 40%
   Y$$.    `.`"Y$$$$P"'
   `$$b      "-.__
    `Y$$
     `Y$$.
       `$$b.
         `Y$$b.
            `"Y$b._
                `""""
使用 Pip 安装
$ sudo apt install -y python3 python3-pip
$ sudo su -
# pip 需全局可用,因此接下来以 root 用户安装包
python3 -m pip install certbot-nginx
正常更新
$ sudo certbot renew
Saving debug log to /var/log/letsencrypt/letsencrypt.log

- - - - - - - - - - - - - - - - - - - - - - - - - - - - - - - - - - - - - - - -
Processing /etc/letsencrypt/renewal/muwaii.com.conf
- - - - - - - - - - - - - - - - - - - - - - - - - - - - - - - - - - - - - - - -
Renewing an existing certificate for muwaii.com and www.muwaii.com
Reloading nginx server after certificate renewal

- - - - - - - - - - - - - - - - - - - - - - - - - - - - - - - - - - - - - - - -
The following certificates are not due for renewal yet:
  /etc/letsencrypt/live/email.muwaii.com/fullchain.pem expires on 2022-06-05 (skipped)
Congratulations, all renewals succeeded:
  /etc/letsencrypt/live/muwaii.com/fullchain.pem (success)
- - - - - - - - - - - - - - - - - - - - - - - - - - - - - - - - - - - - - - - -
进:改用 Cloudflare 15 年证书
添加域名
将你的域名添加到 Cloudflare,由于笔者早已完成添加,此处借用官网文档的这张图来说明。[^1]
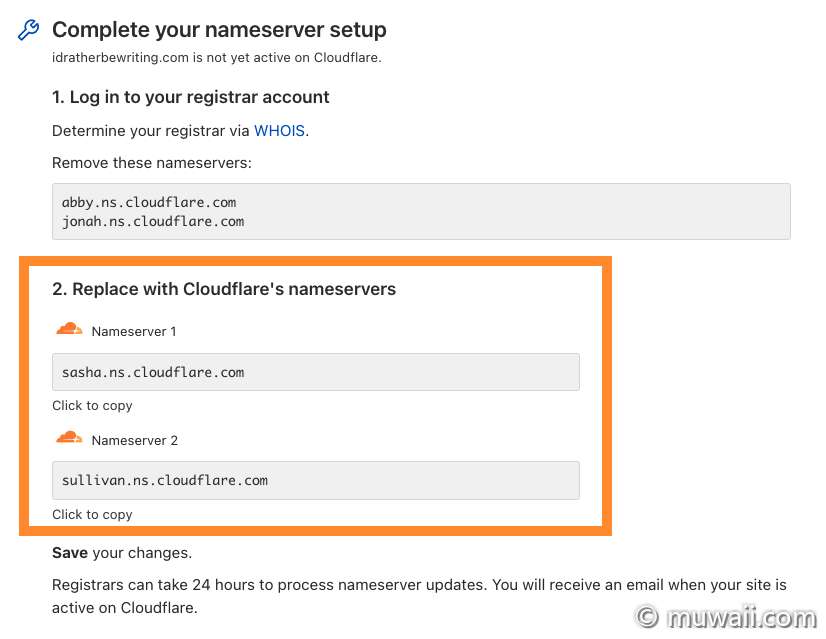
图 1: 添加新域名
修改 Name Server
在购买域名的服务商的管理后台,修改域名的 Name Server,修改成 Cloudflare 的域名服务器。请填写 Dashboard 中给出的地址,不一定和笔者的完全一样,地址格式是 *.ns.cloudflare.com。
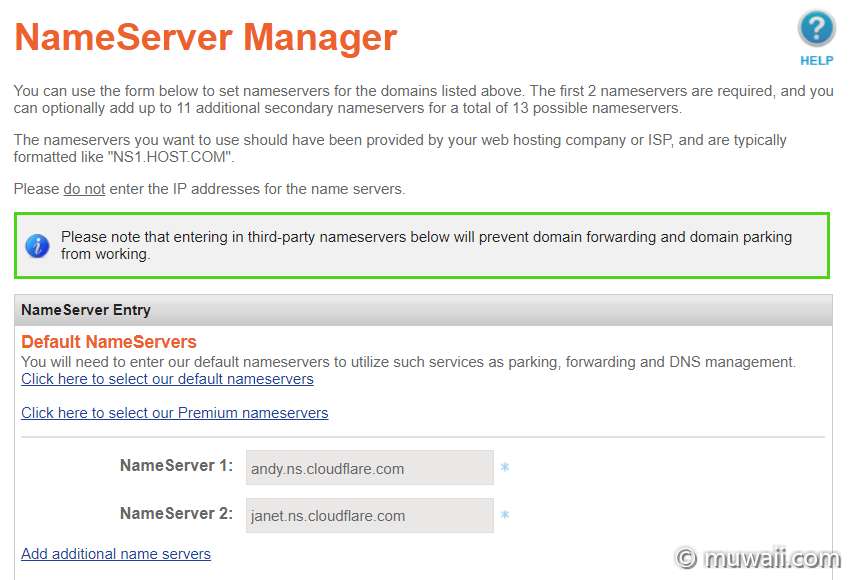
图 2: 修改域名的名称服务器
添加 DNS 解析
点亮橙色小云朵,表示经过 Cloudflare 的代理,客户的请求由 CF 转发到我们的源服务器,即客户不知道也不能直连我们的服务器 IP。
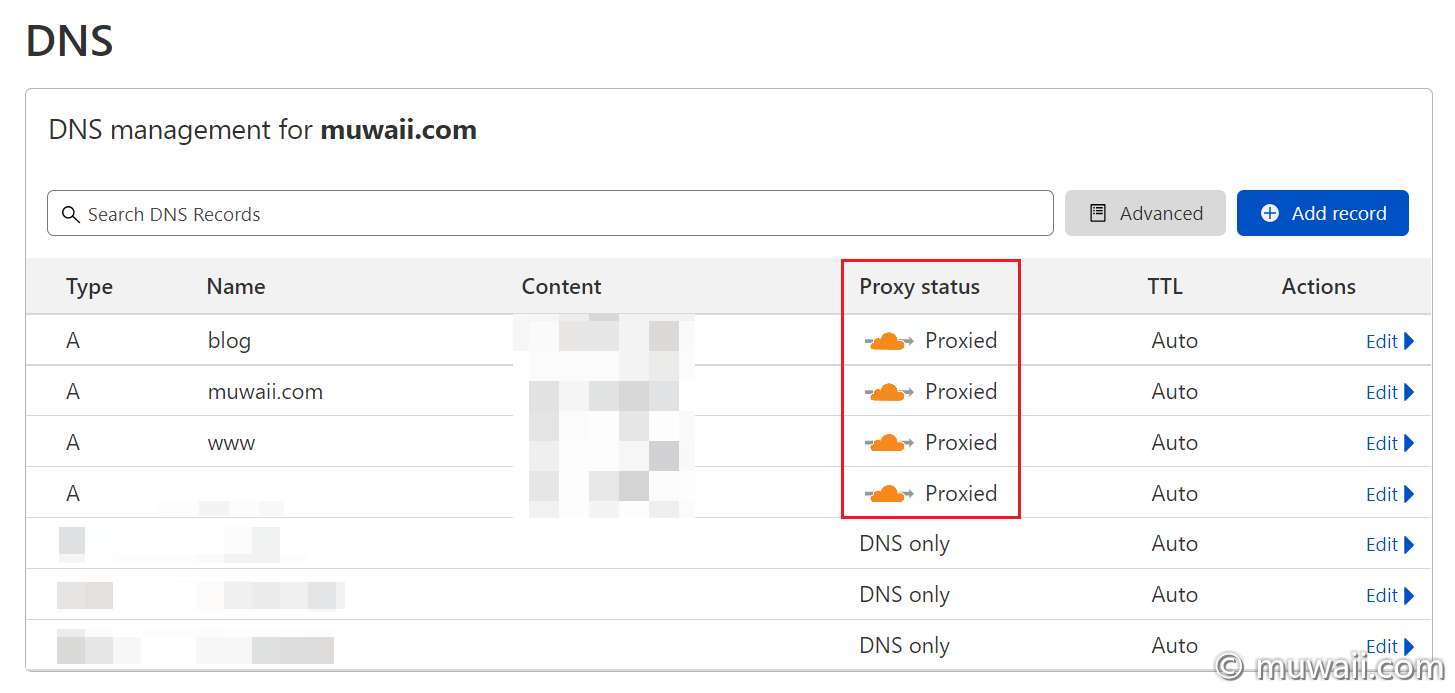
图 3: 启用 DNS 解析 + 请求代理
注:一般服务器都应该配置,不能直接用 IP 访问,以免被 Script Boy 全网段扫描。
开启 Full SSL/TLS
在顶部的菜单条(新版在侧边栏),找到锁标志(SSL/TLS),修改通信链路加密方式为:Full(strict)。
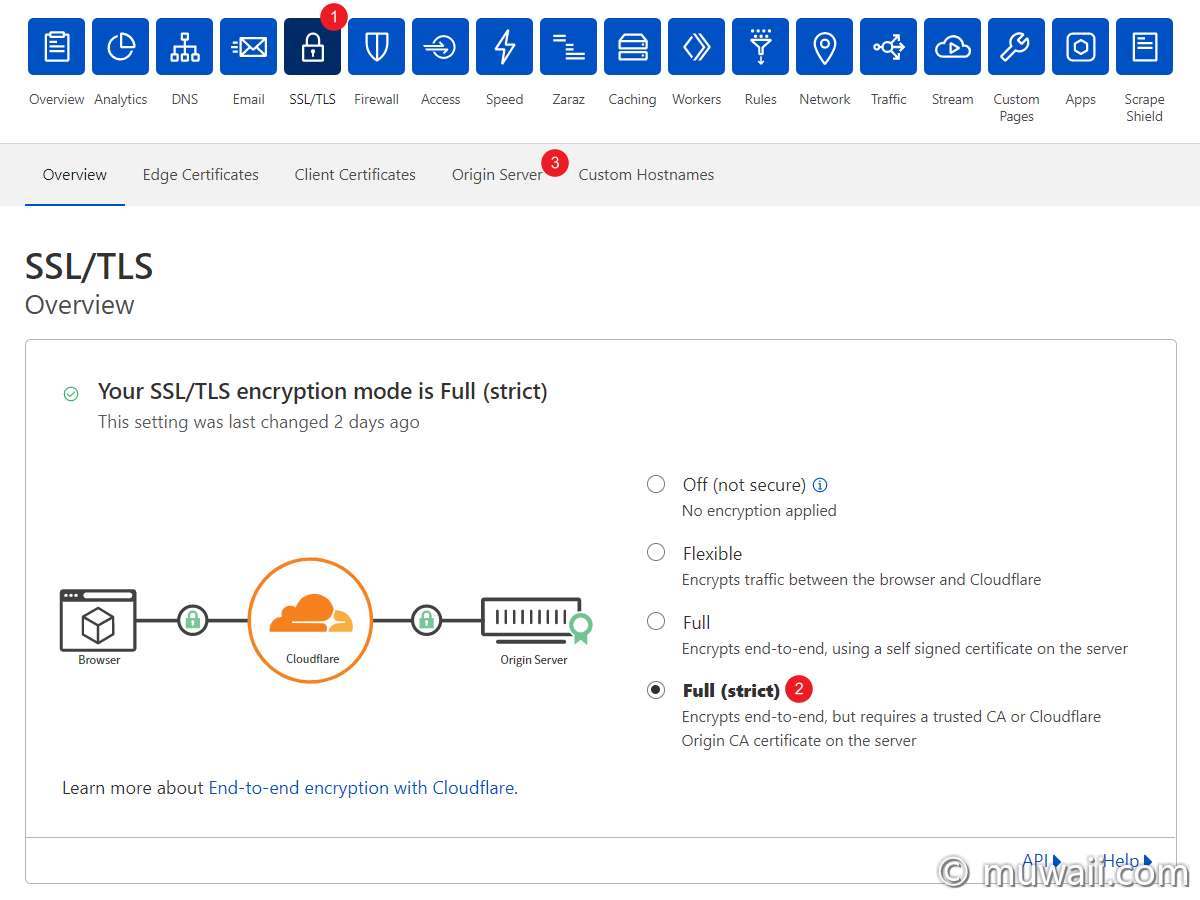
图 4: 选择 Full SSL/TLS 严格端对端加密
这里有四个 SSL 加密选项,然而本页面的文字描述都比较简单,这几种模式之间具体有什么区别呢?
笔者先读了一遍官方的说明文档,对各自适用的场景有了大致的了解;并参阅了森见鹿博客的学习笔记,加深了理解;最后结合自己上手的实践过程,分别展开说明如下表。[^2]
表 1: Cloudflare SSL 加密参数说明表
| 参数 | 含义 | 优点 | 缺点 |
|---|---|---|---|
| OFF | 完全不加密,即不使用 Https 协议 | 无 |
|
| Flexible | 你的网站用户和 Cloudflare 之间有加密连接,但是从 Cloudflare 到你的服务器没有加密。即半程加密。 | 就算你的网站没有 SSL 证书,用户也能实现 SSL 加密访问。 |
|
| Full | 全程加密,从用户到 CDN 服务器再到你的网站,全程都是 SSL 加密的,反之亦同。只要你的服务器有 SSL 证书,就可以实现 SSL 加密访问。 | 不限制证书。 openssh 自签名证书还是正规机构签发的 SSL 都可用 |
在 Cloudflare 到源站中仍存在中间人攻击的风险(包括通过证书劫持和伪造等方式,与严格模式不同,Cloudflare 不会对源站的证书进行审核) |
| Full (strict) |
全程加密,它与 Full SSL 的区别在于你的服务器必须是安装了已受信任的 SSL 证书(即购买的或正规机构签发的 SSL 证书),否则无法开启 SSL 加密访问。 | 安全 新增了对证书的认证,源站如果配置了自签证书、非可信证书或过期证书,那么 Cloudflare 会回复客户端访问失败并返回 526 响应码 |
无 |
了解更多关于Cloudflare 的端到端加密 。[^3]
注:这四种模式仅在启用了 Cloudflare 的 CDN 后——即点亮了橙色小云朵——才有效。如果只是把 Cloudflare 用作 DNS 解析,那么上述的加密模式都不会起作用!
若是有选择困难症,森见鹿同学整理了常用需求对应的模式,请参照下面的流程图:
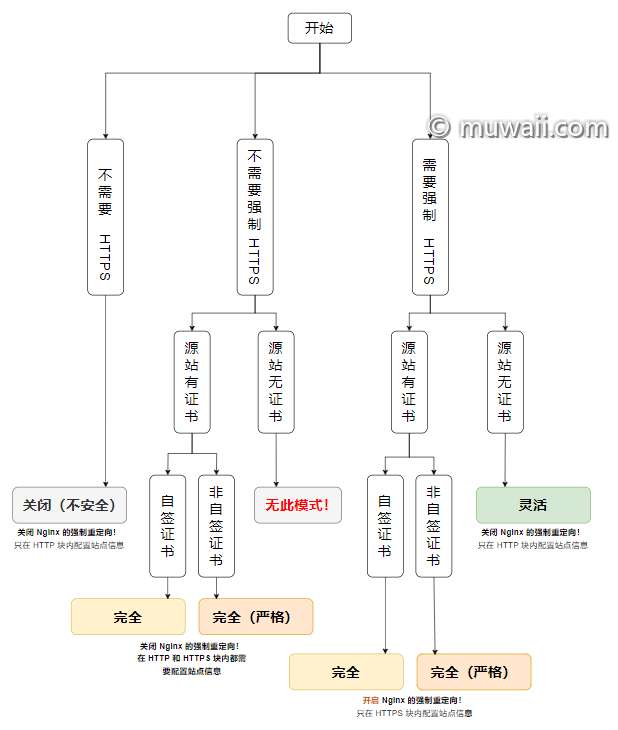
图 5: 加密模式选择流程图
创建 CF 证书
切换到 Origin Server 选项卡,创建 Origin Server Cetificate 源服务器证书(由 Cloudflare 免费签名)。
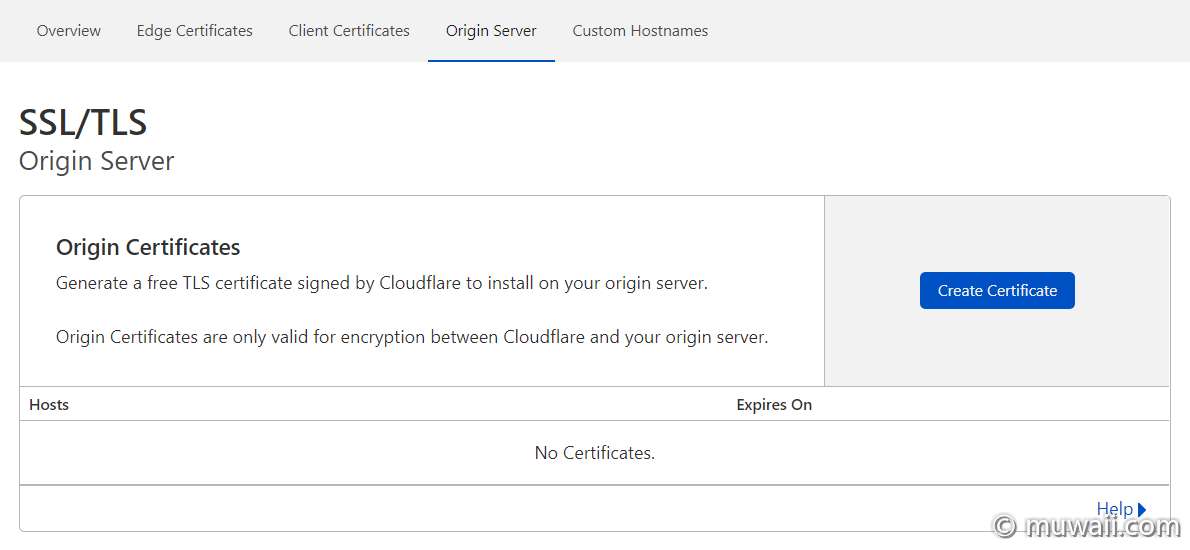
图 6: 创建 SSL 证书
填写证书的生成参数
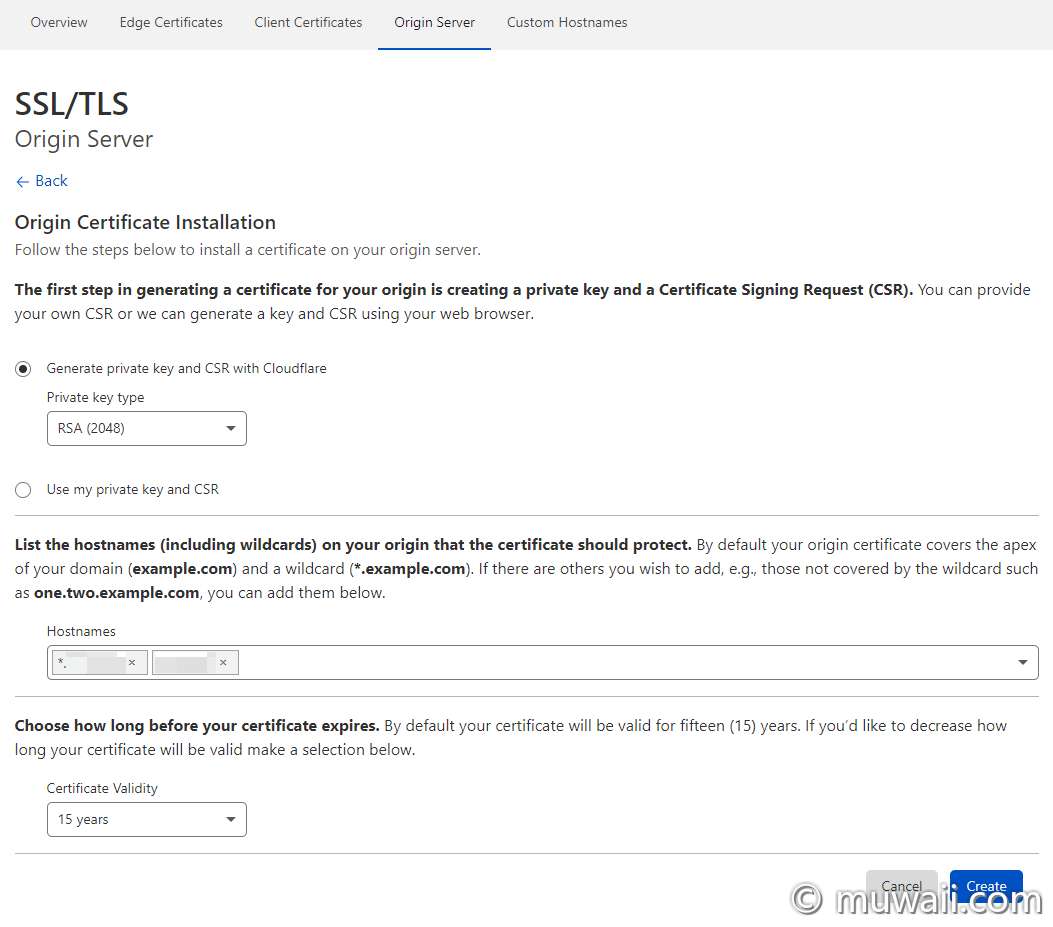
图 7: 选填待生成证书的参数
- 密钥类型:2048 位的 RSA 私钥
- 作用域名:适用于哪些域名(子域名),支持通配符匹配。默认作用范围是
your.site,*.your.site。如果要添加域名的其它级别,例如,通配符未覆盖的级别(如one.two.your.site)可在文本框中追加。 - 有效年限:15 年
获取生成的证书和密钥
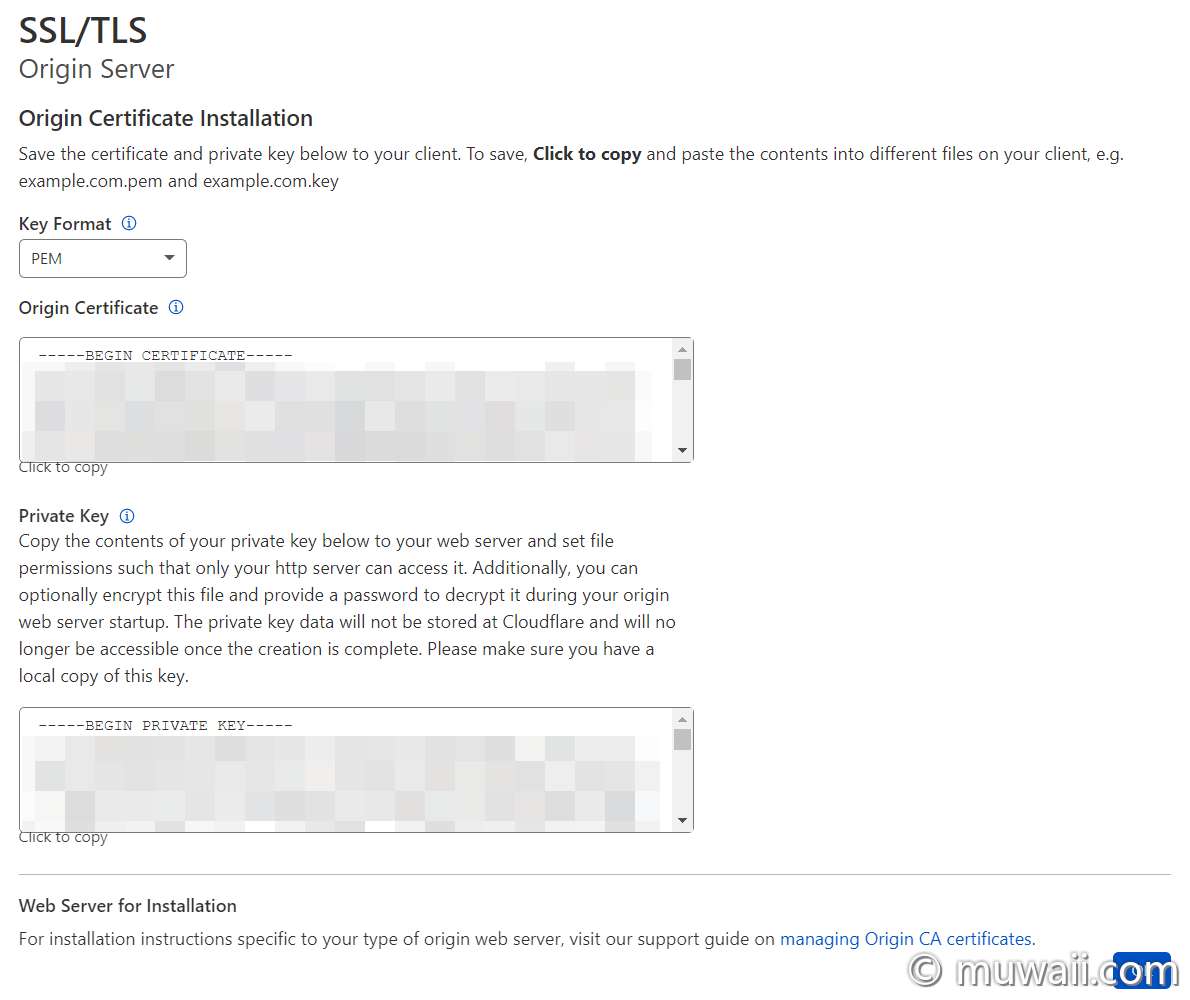
图 8: 获取公私钥对
- 密钥格式:根据你的使用环境来选择公私匙对的格式。
- 大部分基于 OpenSSL Web 服务(如 Apache and NGINX)都是使用 PEM 文本文件(Base64 encoded ASCII),同时也兼容二进制格式的 DER 文件;
- Windows 系统或 Apache Tomcat 服务则是 PKCS#7 格式。
分别拷贝源证书和私钥内容,保存在服务器上。为了安全考虑,应限制只有 Web 服务能够读取。例如,笔者使用的 Nginx,它是以 www-data 用户运行的,因此,文件的权限设置成 root 才能写入,而 www-data 用户只能读取,权限细节如下:
# 设置用户和用户组
chown -R root:www-data /path/to/your/cert/dir
# 设置文件夹和文件权限
chmod 750 /path/to/your/cert/dir
chmod 640 /path/to/your/cert/dir/*
图 9: 公私钥权限
注意:私钥内容不会存在 Cloudflare。一旦创建完成后,公共证书可以重复下载,但私钥内容无法从 CF 后台再次拷贝,请自行妥善保管。
更新 Web 服务器配置
以 Nginx 为例,更新 site-enabled 已启用的站点配置,修改
ssl_certificate:指向你的证书,pem 后缀ssl_certificate_key:指向你的私钥,key 后缀

图 10: Nginx 相关配置
# 重启 Nginx
$ sudo systemctl restart nginx
注:其它类型的 Web 服务器的证书配置,可参考官方文档。[^4]
总结
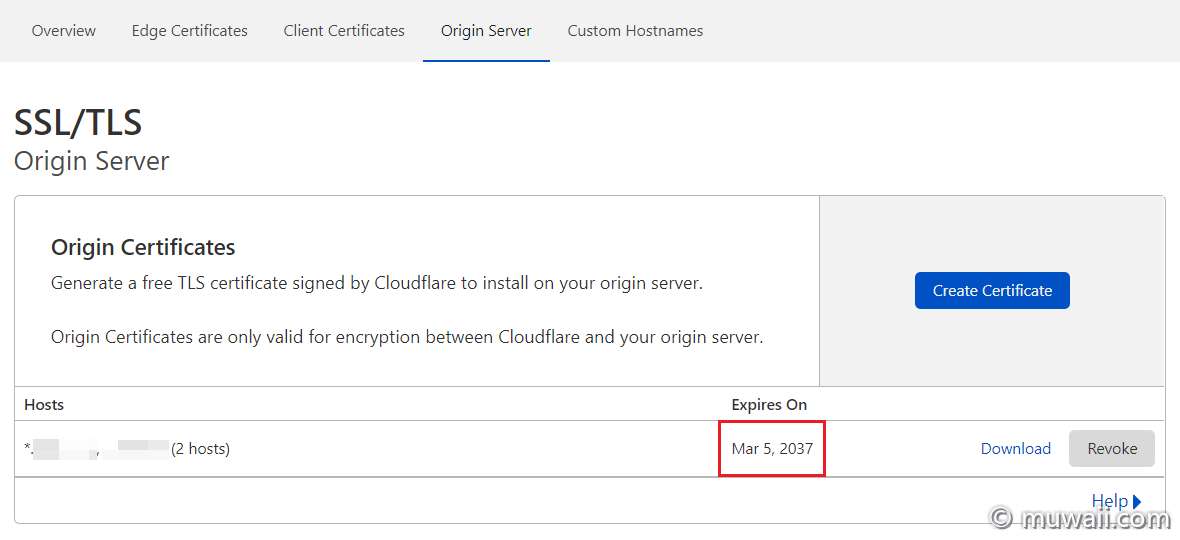
图 11: 确认证书有效期
至此,等 Nginx 重启完,刷新网站的页面,你就可以看到你的网站已经可以使用 HTTPS 加密访问了。
更重要的是,十五年之内不用再更换证书,免受站点因证书过期而宕机之苦😎。只不过,到那时不知道 Cloudflare 或笔者的博客还在不在?🤣
参考链接
- Change your authoritative nameservers (Full setup) | Cloudflare
- Cloudflare 四种 SSL/TLS 加密模式的功能解析及实践 | 森见鹿的博客
- SSL Encryption Modes | Cloudflare
(Learn more about End-to-end encryption with Cloudflare) - Deploy an Origin CA certificate | Cloudflare

那张 Cloudflare SSL 选择流程图清晰明了,英文苦手也看懂了